
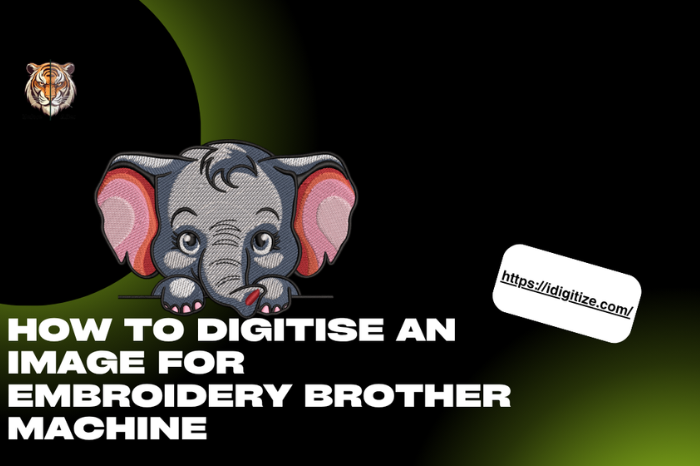
Brother embroidery machines are popular because they are reliable, beginner-friendly, and widely used by both hobbyists and commercial embroidery businesses. However, one common challenge users face is understanding how to convert an image into a format the machine can actually read. Simply uploading a JPG or PNG will not work because embroidery machines require stitch files such as PES format.
To Digitise Image For Embroidery on a Brother machine, the image must first be converted into stitch instructions using embroidery digitising software. This process determines how clean your stitching will look, how smoothly your machine runs, and how professional your final embroidery appears.
This guide explains the exact professional process used to prepare embroidery designs specifically for Brother machines, including software selection, file preparation, stitch settings, and testing methods.
Understanding How Brother Embroidery Machines Read Designs
Brother machines do not read image files. They read embroidery stitch files.
Common compatible Brother formats include:
• PES (most common)
• DST
• EXP
• PEC
Among these, PES is the native Brother embroidery format.
A PES file contains:
• Stitch paths
• Color sequence
• Needle changes
• Density settings
• Machine instructions
This is why proper Digitise Image For Embroidery preparation is necessary before transferring designs to your machine.
What You Need Before Digitising for a Brother Embroidery Machine
Before starting the process, prepare these essentials.
Clean artwork
Use a high-quality image with clear edges. Avoid blurry logos.
Digitising software
You need embroidery software that can export PES files.
Common options include:
• Brother PE-Design
• Hatch Embroidery
• Wilcom
• Ink/Stitch (free option)
USB or WiFi transfer method
Most Brother machines use USB transfer. Some newer models support wireless transfer.
Understanding of stitch basics
Basic knowledge of stitch types improves results significantly.
Many embroidery businesses outsource this step to services like idigitize because professional digitising saves time and prevents machine errors.
Step-by-Step Guide to Digitising Images for Brother Embroidery Machines
Here is the professional workflow.
Step 1: Prepare the Image
Start by preparing artwork properly.
Professional preparation includes:
• Removing gradients
• Simplifying colors
• Increasing contrast
• Cleaning edges
Embroidery works best with clear shapes instead of complex photo detail.
Vector conversion is often recommended because vector artwork produces cleaner stitches.
Step 2: Import Artwork into Digitising Software
Next, import the design into embroidery software.
In software like PE-Design:
Import image → Adjust size → Set hoop size → Begin digitising.
Always set the correct hoop size first because scaling later may affect stitch density.
Step 3: Assign Stitch Types Properly
Different elements require different stitches.
Professionals typically use:
Satin stitch
Used for lettering and borders.
Fill stitch
Used for larger areas.
Running stitch
Used for outlines and details.
Correct stitch selection is essential when you Digitise Image For Embroidery because wrong choices cause thread breaks and uneven stitching.
Step 4: Adjust Stitch Direction
Stitch direction improves design quality and texture.
Professionals adjust stitch angles to:
• Improve appearance
• Prevent fabric pulling
• Add dimension
• Improve durability
This is one of the biggest differences between professional and beginner digitising.
Step 5: Add Underlay for Stability
Underlay stitches support top stitches and stabilize fabric.
Without underlay, embroidery may:
• Shift
• Gap
• Sink into fabric
Professional digitizers always apply underlay before final stitching layers.
Step 6: Set Proper Stitch Density
Density determines stitch tightness.
Professionals adjust density based on:
• Fabric thickness
• Thread weight
• Design size
• Machine speed
Balanced density improves machine performance and design durability.
This is why professional Digitise Image For Embroidery services carefully optimize stitch settings instead of relying on automatic conversion.
Step 7: Set Color Sequence
Efficient color sequencing reduces machine stops.
Professionals organize stitching order to:
• Reduce thread trims
• Avoid unnecessary jumps
• Improve efficiency
• Reduce production time
This is especially important for commercial embroidery workflows.
Step 8: Export the File in PES Format
After digitising, export the file.
Typical process:
File → Export → Select PES → Save.
Always confirm compatibility with your Brother machine model.
Step 9: Transfer File to Brother Machine
Transfer methods include:
USB method:
Save PES file → Insert USB → Load design → Select on machine screen.
Wireless method (new models):
Send file through Brother software connection.
Step 10: Always Run a Test Stitch
Testing prevents production errors.
A test run reveals:
• Thread breaks
• Density problems
• Alignment issues
• Fabric puckering
Professional digitizers always test before final production.
Common Problems When Digitising for Brother Machines
Many beginners face these issues.
Design too detailed
Small details often fail in embroidery.
Wrong file format
Always export PES.
No underlay
This causes unstable stitching.
Too many colors
More colors increase production complexity.
Overdense stitching
This causes thread breaks.
Professional embroidery quality depends heavily on proper digitising preparation.
Best Practices for Better Brother Machine Embroidery Results
Professionals follow several rules.
Keep text readable
Avoid very small fonts.
Adjust design size properly
Resizing after digitising causes problems.
Match design to fabric
Different fabrics require adjustments.
Use quality thread
Thread quality affects stitch finish.
Work with professional digitisers when needed
Businesses that rely on embroidery often use expert digitisers like idigitize to ensure production quality.
When to Use Professional Digitising Instead of DIY
DIY digitising works for practice, but professional digitising is recommended if:
• You sell embroidered products
• You need consistent branding
• You work with complex logos
• You run embroidery production
• You want faster turnaround
Professional digitising reduces production errors and improves stitch consistency.
Conclusion
Understanding how to digitise designs correctly is essential if you want professional results from your Brother embroidery machine. The process involves preparing artwork, selecting proper stitch types, adjusting density, and testing before production.
When you Digitise Image For Embroidery correctly, you improve stitch quality, reduce machine errors, and produce more consistent embroidery results. While beginners can learn the basics, professional digitising ensures the best results for business or commercial embroidery needs.
If embroidery quality matters for your projects, investing time in proper digitising practices or working with experienced digitizers can make a significant difference.
FAQ Section
Can I convert JPG to PES directly?
No. JPG must first be digitised into stitch data before converting into PES format.
Is Brother PE Design necessary?
No, but it is the most compatible software. Other digitising software can also export PES files.
Why does my Brother embroidery design look distorted?
Common causes include wrong density, missing underlay, or poor stitch direction.
Can beginners learn embroidery digitising?
Yes, but it takes practice. Understanding stitch behavior takes time.
What is the easiest way to digitise designs?
Using professional digitising services is often the fastest way to get production-ready files.


Leave a Reply