

Introduction:
Each time you click on a link on a website, an amazing digital process takes place behind the scenes instantly. Understanding the working of this request-response cycle forms the most important achievement point for any student who is taking a Django Course.
As a web developer in the making, learning about this mysterious process will help you to create extremely fast and optimised web applications. By taking a full-fledged Django course, you can know exactly how one user request turns into one database operation after another in stages.
Django Request Lifecycle from URL to Database Explained
To make it easy for you to understand the whole process, here is the complete guide to the request processing pipeline:
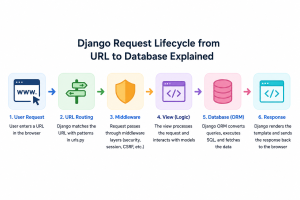
Here is the flow chart to show the data movement from the moment the user clicks through to the persistent storage layer.
How a Django Request Starts After a User Opens a URL?
The request processing journey begins when a user enters a particular URL in their browser. It triggers a request containing information being transferred securely to your application server via the Internet. In production, special software components known as web servers intercept the incoming network requests to frameworks. The web server delivers the incoming raw request package to the simple server gateway interface, such as WSGI or ASGI.
Step 1: Routing Through the URL Conf:
After the request is sent to the framework, it gets directly into your URL files to be processed. You can compare this particular step with the policeman of your whole web application. The framework scans the requested web path in comparison with the routes you have in the list, from the first to the last one.
- Pattern Matching: To find a match and find the appropriate view function that corresponds to the web path.
- Variable Capture: If a match is found, the router extracts the important variables such as IDs.
When no route matches the request, the application stops and shows a standard 404 error page.
Step 2: The Middleware Layers:
However, before getting to the core functionality of your program, the request will need to go through the security process known as middleware. Middleware involves some brief software steps to validate each request coming into the web server. These security layers validate user logins, handle session management, and prevent malicious tracking by third parties.
| Middleware Type | Core Responsibility | Real-World Technical Purpose |
| Security Middleware | Device Filtering & Headers | Blocks unsafe script injections |
| Session Middleware | Token Verification | Identifies exactly who is making requests |
| CSRF Middleware | Verification Keys | Validates all incoming secure form inputs |
You can always include custom validations based on your requirements for the software application. As soon as the request is successfully validated on all fronts, the clean request is sent to your view.
Step 3: Inside the View Logic:
The view is basically the mastermind behind the entire process of request and response. It is the core phase in a workflow of a Django Full Stack Developer wherein the system executes your business logic. It receives input form data, validates access permissions, and determines which facts need to be selected. Views typically connect with the database using Django’s ORM system rather than talking directly to the table.
Step 4: Interacting with the Database via the ORM:
As opposed to coding directly on the database, there is an object-relational mapper at hand that converts simple Python statements to complex database queries with no need for external tools.
- Query Generation: The view calls a Python method to find out particular pieces of information.
- SQL Execution: The database runs the query and fetches all related rows from the table.
- Data Conversion: The object-relational mapper then converts these database rows to normal Python objects.
Such an automatic process helps to save an enormous amount of development time and also shields your application against dangerous SQL injection vulnerabilities.
Step 5: Rendering the Layout and Sending the Response:
Now that the view function holds the right database facts, it must package everything for the browser. The view combines a basic layout template file with your dynamic database Python dictionary inside the engine. The template engine replaces placeholder tags in HTML files with actual live data from your database tables. It processes simple rules and loops to create the final text that browsers can show on screen. The view wraps this finished HTML text inside a formal HTTP response object for final delivery.
Django Request-Response Cycle Explained with a Dashboard Example:
Let us consider the actual user workflow to get an idea of how the components work in real-time. Suppose we have a student who visits the academic website and logs in there to get the dashboard of his or her personal quiz scores.
The request gets passed to the URL router, session middleware, and the dashboard view function right away. The view function then utilises the object-relational mapper in order to make a database call for the particular student score profile. The numbers get returned, the template renders the graphs, and finally, the HTML code gets sent to the user. Clarifying all these steps in detail is the main objective of a Django Certification Course.
Performance and Scalability Considerations:
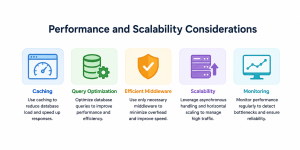
In addition to its structural design, Django also comes with many built-in features that assist in making an application’s performance during a request better. Caching systems can be introduced to lighten the load on the database and deliver pages faster. Databases can be efficiently queried and effective middleware can be utilized in order to develop large scale applications capable of sustaining a huge amount of traffic. This makes Django a preferred framework for modern enterprise web solutions.
Conclusion:
Learning the whole request-to-database path changes how you plan and build backend web projects. Every component from the first to the last step has a single purpose. Once you follow this entire pipeline step-by-step, debugging and performance tuning become a piece of cake for you. Understanding this data movement process will help you in developing better software applications. Continue practising with this technique and trace your entire data pipeline line by line.


![The Shadow over Blackmore [v0.5.2r] [Darktoz]](https://www.smilebox.co.za/wp-content/uploads/2026/06/The-Shadow-over-Blackmore-v0.5.2r-Darktoz-1.jpg)

Leave a Reply